Embankment Slides Worksheet
Do you need help finding the right slide?
Slide SelectionDo you need a FREIGHT price?
FREIGHT WorksheetNeed help getting the correct spiral slide?
SPIRAL WorksheetJust need help or request information?
Contact UsAn embankment slide or hillside slide is a fun way to descend. Safety is important; we do not want Jack and Jill "tumbling" down the hill, but sliding safely! Hillside, embankment, or slope slides are NOT terribly complicated, but they require planning to ensure that safety, form, and function all come together.
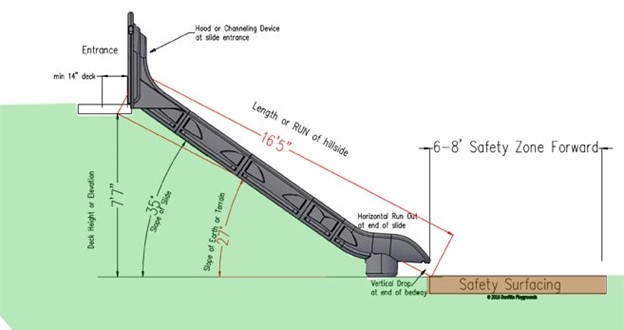
An embankment slide allows a long bedway slide in a play area without stairs, ladders, decks, or dangerous fall heights. The bedway should never be more than one foot above the ground. After some definitions, you may fill in the worksheet as you go.
You will need to know:
- Deck Height: This is the hill’s elevation. If unsure, it can be calculated using slope and length. Use architectural plans or a long straight board and slope apps for help.
- Angle or Slope: Too steep is dangerous; too shallow and users won’t reach the bottom. Follow standards: < 30° for preschoolers; never > 50°.
- Slide Length: Relates to height and angle. A rough estimate: length ≈ 2× height. Plan for use zones at the bottom.
- Slide Shape: Straight, curved, or winding. Covered or deep bedways are safer. Design affects cost, safety, and performance.
- Slide Class (Grade): Residential slides are cheaper but not durable. Commercial-grade slides are thicker, bolted, UV-stabilized, and safer. Metal slides add durability.
PLANNING FOR YOUR SLIDE
- Identify the area. You may need to stabilize it to prevent movement.
- Take photos from top, bottom, and side views to document the slope.
- Mark and measure the slope. Use free apps with a flat board for accuracy.
- Sketch the slope and determine where the slide will exit. Include the use zone.
- Share your measurements and photos — we’ll help from there!
* Indicates a required field