Ball Hog Assembly Instructions
| Bill of Materials | |
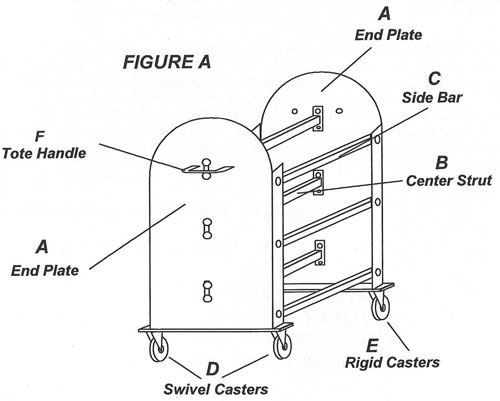
| A (2) End Plate | I (16) 5/16" Lockwasher |
| B (3) Center Strut | J (16) 5/16" Hex Nut |
| C (6) Side Bar | K (24) 3/8" x 1 1/2" Carriage Bolt |
| D (2) Swivel Caster | L (12) 3/8" Flatwasher |
| E (2) Rigid Caster | M (24) 3/8" Lockwasher |
| F (1) Tote Handle | N (24) 3/8" Hex Nut |
| G (16) 5/16" x 1" Machine Screw | O (2) Palnut Fastener |
| H (32) 5/16" Flatwasher | |
NOTE: Immediately unpack all components and cross check against bill of materials. Report any shortages to DunRite Customer service at 1-281-242-5921.
1. Lay both End Plate face down on a working surface. Using the 5/16” machine screws, flatwashers, lockwashers and hex nuts, attach two Swivel Casters to one of the End Plates. Attach two Rigid Casters to the bottom of the remaining End Plate.
NOTE: You should use (2) Flatwashers per 5/16” machine screw. This will allow clearance for the swivel casters to rotate properly.
2. Connect the two End Plates together as shown in Figure A, by bolting the (6) Side Bar to the End Plates using the 3/8”x 1 ½” Carriage Bolts, Lockwashers and Hex Nuts (no flatwashers for this step). Note: The Side Bar pieces bolt to the inside of the End Plate with the carriage head of the bolt on the outside.
3. Next, attach (3) Center Strut as shown in Figure A using the remaining 3/8” hardware.
4. Locate the End Plate with the Swivel Casters. This is the End Plate which you will attach your Tote Handle to. Secure Tote Handle to End Plate using two Palnut fasteners provided. Insert Tote Handle through attachment holes and tap palnuts in place with hammer. Tote Handle is design to retract for tight storage situations. Important, ball cart will not steer correctly if Tote Handle is attached to the wrong End Plate. Make sure to attach the Tote Handle to the End Plate with the SWIVEL CASTERS!
5. Make sure all hardware is tight and secure.
6. Ball Hog assembly is complete!